
Introduction
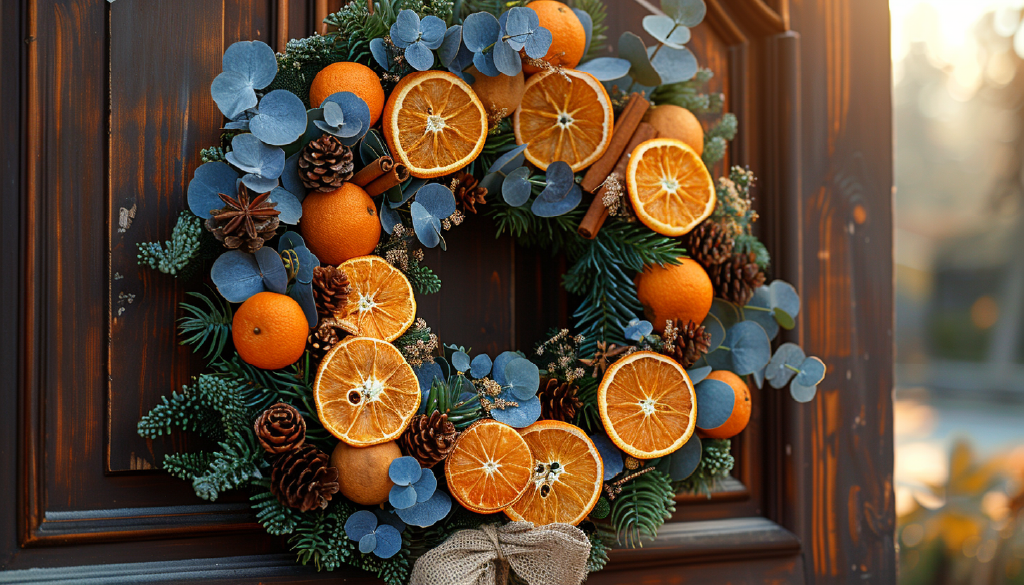
There’s something undeniably charming about the warm, rustic appeal of a dried orange wreath adorning your front door or hanging above your fireplace. If you’ve been wondering how to make a dried orange wreath that brings natural beauty into your home, you’re in for a treat! This DIY project combines the satisfying process of drying citrus with creative arrangement techniques, resulting in a stunning decoration that engages multiple senses. I’ve been crafting these fragrant beauties for years, and they never fail to impress guests while filling my home with subtle citrus aromas. Whether you’re planning ahead for holiday decorating or simply want to add a touch of handcrafted elegance to your space, this guide will walk you through everything you need to know to create your very own dried orange wreath masterpiece.


Materials You’ll Need
Before diving into the creative process, let’s gather all the necessary supplies. Having everything prepared beforehand will make the crafting experience much more enjoyable.
- Oranges – 5-7 medium-sized oranges (navel oranges work beautifully)
- Wreath base – Grapevine, willow, or wire frame (8-12 inches in diameter)
- Floral wire – Thin gauge for attaching elements
- Wire cutters – For trimming wire
- Hot glue gun and glue sticks – For secure attachments
- Natural embellishments – Cinnamon sticks, star anise, pine cones, dried flowers
- Greenery – Eucalyptus, rosemary sprigs, bay leaves (fresh or dried)
- Ribbon – For hanging and decorative touches
- Baking sheets – For drying oranges
- Parchment paper – To prevent sticking
Pro Tip: If you’re planning to make multiple wreaths or want extra dried oranges for other decorations, double your orange quantity. They store well and can be used for various projects throughout the season!
Step-by-Step Guide to Making a Dried Orange Wreath
1. Drying Your Oranges
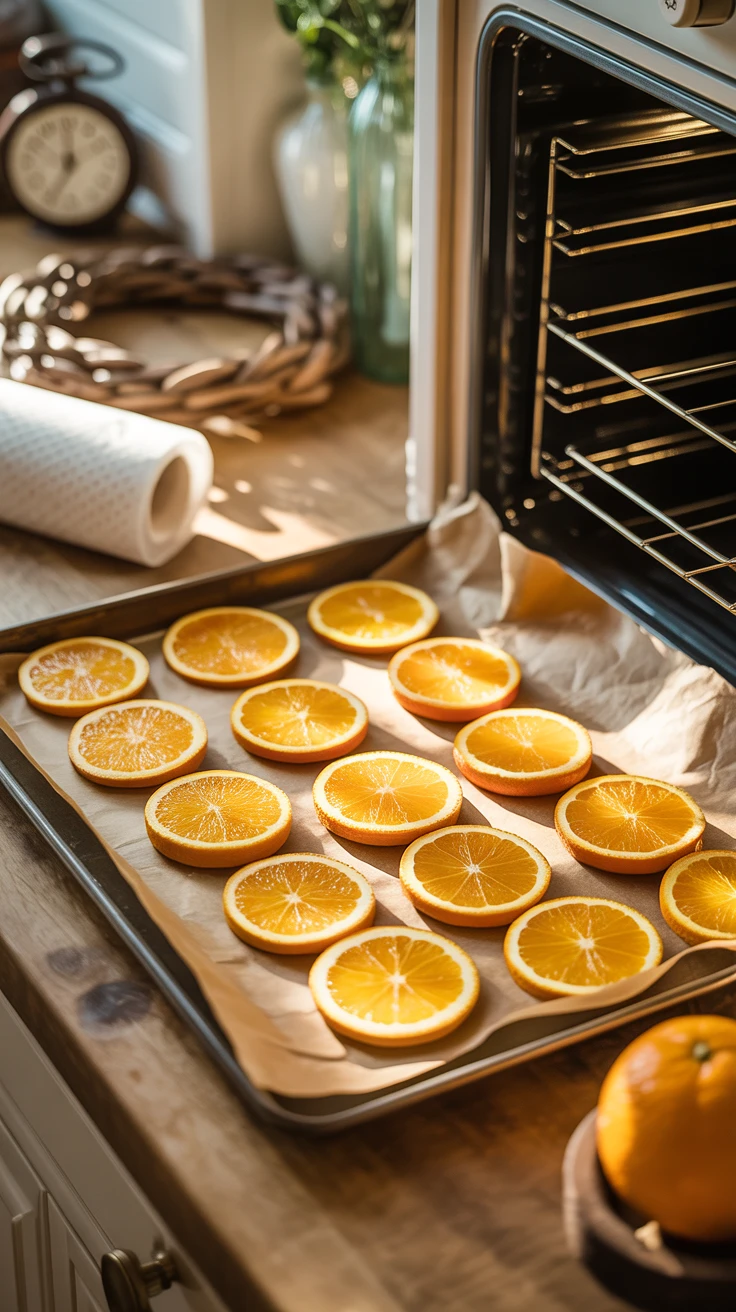
The foundation of a beautiful dried orange wreath is, of course, perfectly dried orange slices. This process takes a bit of time but requires minimal active effort.
- Preheat your oven to its lowest setting (usually 170-200°F/75-95°C).
- Slice oranges into approximately ¼-inch thick rounds. The thinner you slice them, the faster they’ll dry, but too thin and they’ll become fragile.
- Pat the slices dry with paper towels to remove excess moisture.
- Arrange slices in a single layer on parchment-lined baking sheets.
- Place in the oven for 2-3 hours, flipping every 30 minutes to ensure even drying.
- Oranges are ready when they’re no longer sticky to the touch but still maintain their vibrant color.

View on AmazonAs an Amazon Associate, I earn from qualifying purchases.

View on AmazonAs an Amazon Associate, I earn from qualifying purchases.
I’ve found that leaving the oven door slightly ajar helps moisture escape and prevents the oranges from browning too quickly. You’re looking for that perfect translucent stained-glass effect where light passes through beautifully.
2. Preparing Your Wreath Base

While your oranges are drying, prepare your wreath foundation:
- If using a grapevine or willow wreath, check for any loose pieces and trim as needed.
- For a wire frame, consider wrapping it with burlap ribbon or moss to create a more substantial base.
- Decide on the overall design – will your oranges cover the entire wreath or just a portion?

View on AmazonAs an Amazon Associate, I earn from qualifying purchases.

View on AmazonAs an Amazon Associate, I earn from qualifying purchases.
Pro Tip: I like to lay out all my materials on a large surface and “audition” different arrangements before committing. Take photos of layouts you like to reference during assembly!
3. Assembling Your Wreath

Now comes the fun part – bringing your dried orange wreath to life!
- Start by attaching a few anchor points of greenery around your wreath base using floral wire. This creates a lush foundation.
- Next, begin securing your dried orange slices. You can either:
- Thread wire through the center of each slice and wrap around the base
- Create small wire loops attached to the back of each slice with hot glue
- Directly hot glue slices to a sturdy base (though this offers less security)
- Arrange oranges in an overlapping pattern, working your way around the wreath or concentrating on one section for an asymmetrical design.
- Add cinnamon sticks, star anise, and other natural elements between orange slices, securing with wire or hot glue.
- Fill any gaps with smaller pieces of greenery or dried flowers.
- Attach a ribbon for hanging by creating a loop and securing it to the back of the wreath.
Remember, there’s no right or wrong way to arrange your elements – let your creativity guide you! I personally love the look of varied orange slice sizes clustered together with cinnamon sticks radiating outward.
Styling Variations for Your Dried Orange Wreath
One of the joys of making your own dried orange wreath is the ability to customize it to your personal style and home decor. Here are some inspiring variations to consider:
Seasonal Themes

- Christmas Wreath – Add pine sprigs, holly berries, pinecones, and cinnamon sticks with a red ribbon
- Fall Harvest – Incorporate dried apple slices, mini gourds, and autumn leaves
- Spring/Summer – Pair with lavender sprigs, dried roses, and lighter greenery
Color Schemes

- Traditional – Orange slices with green accents and brown natural elements
- Monochromatic – Focus on oranges and yellows with dried lemon slices
- Modern – Black ribbon with orange slices and white accents like cotton stems
Don’t be afraid to think beyond oranges! Have you considered adding dried blood oranges for a deeper red hue, or lime slices for a pop of green? The possibilities are endless!
Care and Storage Tips

To ensure your beautiful dried orange wreath lasts as long as possible, proper care is essential:
- Hang your wreath in a location protected from direct sunlight, which can fade the vibrant orange color.
- Avoid areas with high humidity or direct exposure to rain if hanging outdoors.
- Gently dust with a soft brush or blow with compressed air if needed.
- Spray with a light coat of unscented hairspray to help preserve and protect (optional).
- When not in use, store your wreath in a breathable container (not plastic) in a cool, dry place.
- Place a silica gel packet in your storage container to absorb any moisture.
Pro Tip: If your wreath will be exposed to outdoor elements, consider applying a clear acrylic sealer spray designed for dried flowers to provide additional protection.
Troubleshooting Common Issues

Even experienced crafters encounter challenges. Here’s how to address common problems:
Oranges Not Drying Properly
If your orange slices remain sticky or develop mold:
- Ensure slices are patted thoroughly dry before baking
- Increase oven time by 30-minute increments
- Store partially dried slices with silica gel packets to complete drying
Elements Falling Off the Wreath
For more secure attachments:
- Use a combination of wire and glue for heavier elements
- Create wire “staples” that go through the wreath base
- Allow hot glue to cool completely before moving the wreath
Color Fading
To maintain vibrant colors:
- Avoid over-drying oranges in the oven
- Store away from direct sunlight
- Consider a UV-resistant spray for wreaths in bright locations
Key Takeaways
- Patience is key when drying oranges – low and slow creates the best translucent effect
- Secure attachment methods (combination of wire and glue) ensure longevity
- Layering different natural elements creates visual interest and depth
- Proper storage between seasons extends the life of your dried orange wreath
- Personalization makes your wreath unique – don’t be afraid to experiment!
Conclusion
Creating your own dried orange wreath is a rewarding craft project that results in a beautiful, fragrant decoration you’ll be proud to display. The process of transforming simple oranges into translucent, jewel-like accents and arranging them with complementary natural elements allows for endless creativity and personalization. Whether you’re making one as a seasonal decoration, a thoughtful gift, or a signature piece for your home, the skills you’ve learned in this guide will serve you well. I hope you’ve been inspired to gather your materials and start drying those oranges! Remember, the most beautiful wreaths often come from experimenting and letting your personal style shine through. Now that you know how to make a dried orange wreath, you can enjoy this sustainable, natural decoration year after year.
Frequently Asked Questions
How long do dried orange wreaths last?
With proper care, a dried orange wreath can last 1-2 years or even longer. Store it in a cool, dry place away from direct sunlight and humidity when not in use. Applying a light coat of unscented hairspray can help preserve the oranges and extend the wreath’s lifespan.
Can I use other citrus fruits for my wreath?
Absolutely! Lemons, limes, grapefruits, and blood oranges all dry beautifully and can create stunning color variations. Just remember that larger fruits like grapefruit will take longer to dry completely and may require thinner slicing.
What’s the best way to dry oranges for a wreath?
Oven-drying at a low temperature (170-200°F/75-95°C) is the most reliable method for most crafters. For the best results, slice oranges to an even thickness (about ¼ inch), pat dry with paper towels, and flip them every 30 minutes while drying. A food dehydrator can also work well if you have one available.
How do I prevent mold on my dried orange wreath?
Ensure oranges are completely dry before assembly—they should be rigid and not sticky to the touch. Store the wreath in a well-ventilated area with low humidity. If you live in a particularly humid climate, consider adding a light spray of diluted white vinegar (1:3 with water) as a natural mold deterrent before final assembly.
Can I make a dried orange wreath without a wire frame?
Yes! Alternative bases include grapevine wreaths, embroidery hoops, bent willow branches, or even a sturdy cardboard ring covered with twine or fabric. Each base will give your wreath a different character and may require adjusting your attachment methods accordingly.
What other natural elements pair well with dried oranges?
Cinnamon sticks, star anise, pine cones, dried apple slices, rosehips, dried berries, eucalyptus, cedar sprigs, bay leaves, dried flowers (like roses or lavender), wheat stalks, and various seedpods all complement dried oranges beautifully. The key is to vary textures and shapes while maintaining a cohesive color palette.
Is it better to use fresh or store-bought dried oranges?
Home-dried oranges typically retain more vibrant color and allow you to control the thickness and dryness level. Store-bought dried oranges can be convenient but are often more expensive and may contain preservatives or dyes. If you do purchase pre-dried oranges, look for those without added chemicals for a more natural appearance and scent.
