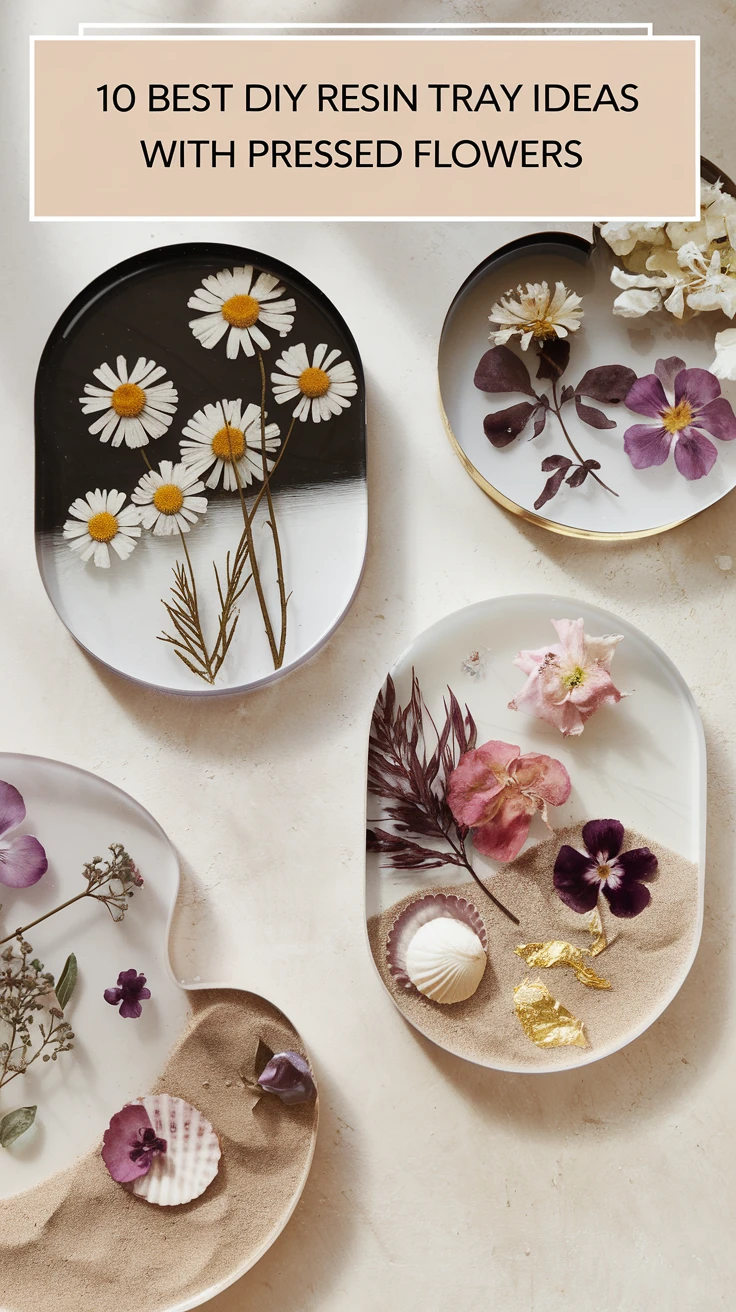

Introduction: The Magical World of DIY Resin Trays with Pressed Flowers
I’ll never forget the first time I poured resin over a carefully arranged collection of pressed daisies. There’s something almost magical about how these delicate blooms are suspended in time, preserved in a glossy, crystal-clear medium. If you’ve been scrolling through Pinterest or Instagram lately, you’ve probably noticed that DIY resin trays with flowers have become incredibly popular—and for good reason! They’re stunning, practical, and make for thoughtful personalized gifts.
Whether you’re a seasoned crafter or a curious beginner, creating your own resin trays with pressed flowers allows you to bring nature’s beauty into your home in a functional way. Ready to dive into this rewarding craft? I’ve put together my absolute favorite DIY resin tray ideas with pressed flowers that range from simple afternoon projects to more intricate weekend endeavors. Let’s transform those pretty blooms into conversation-starting home decor!

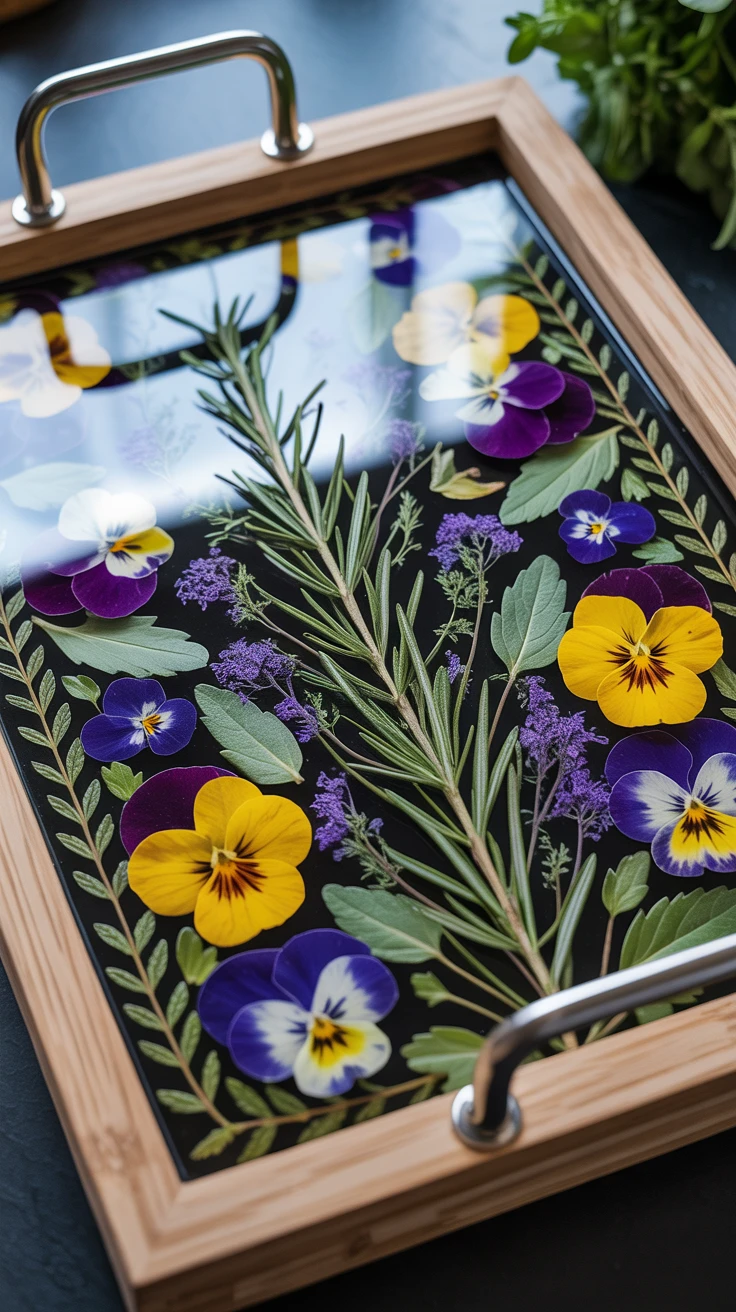
1. Elegant Botanical Serving Tray
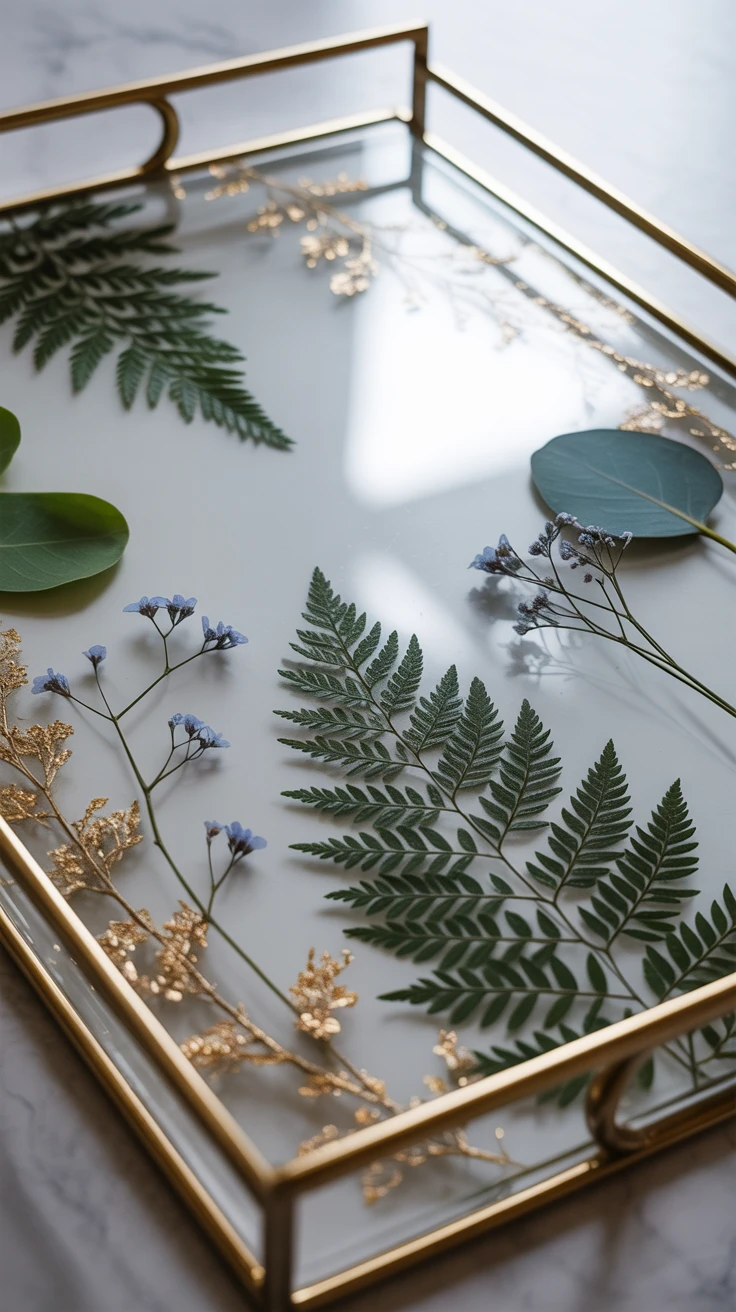
An elegant serving tray adorned with pressed botanicals makes for a sophisticated addition to any dinner party or coffee table setup. I love using this as my go-to hostess gift—it’s always a hit!
What You’ll Need:
- Large rectangular silicone mold (approximately 12″ x 8″)
- Clear casting epoxy resin (food-safe if using for serving)
- Pressed ferns, eucalyptus, and delicate flowers
- Gold or silver metallic flakes (optional)
- Decorative handles
- Drill with appropriate bits
- Sandpaper in various grits
For this project, arrange your pressed botanicals in a pattern that allows the natural shapes to complement each other. Ferns and eucalyptus create an elegant backdrop for smaller blooms like forget-me-nots or baby’s breath. Pour your first thin layer of resin, carefully place your botanical elements, then seal with additional layers.


View on AmazonAs an Amazon Associate, I earn from qualifying purchases.
Pro Tip: Add tiny metallic flakes around the edges for a subtle gilded effect that catches the light beautifully when you’re serving drinks or appetizers.
2. Colorful Wildflower Vanity Tray
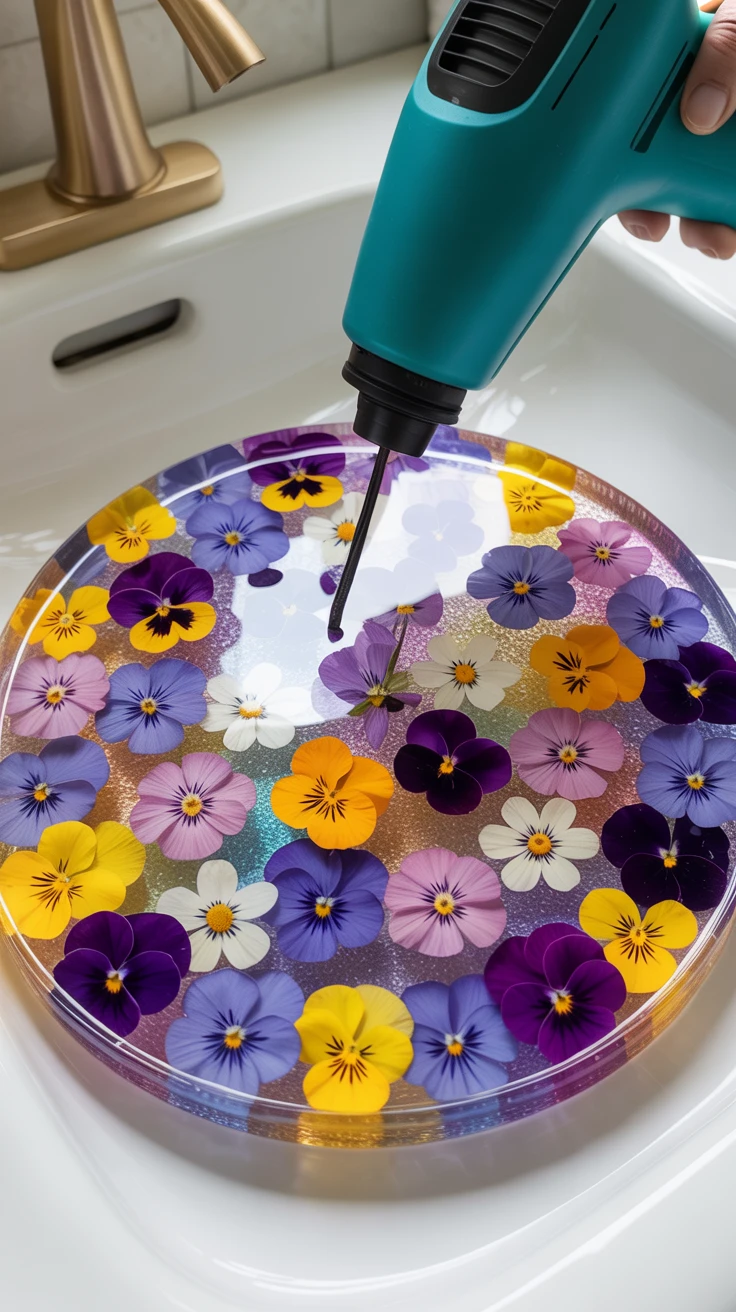
Who says your bathroom counter can’t be a meadow of wildflowers? This vibrant vanity tray brings a pop of color to your daily routine and keeps your essentials organized.
What You’ll Need:
- Medium-sized round or oval silicone mold
- Clear epoxy resin
- Assorted colorful pressed wildflowers (pansies, violets, cornflowers)
- Mica powder in complementary colors (optional)
- Non-stick stir sticks and cups
- Heat gun or torch for bubble removal
The beauty of wildflowers is their natural variety. Don’t be afraid to mix and match colors and species for a meadow-like effect. I’ve found that adding a subtle tint to the resin base using mica powders can make the flower colors pop even more dramatically.
Pro Tip: Create a gradient effect by arranging flowers from lightest to darkest across the tray, mimicking the natural variation you’d see in a wildflower field.
3. Minimalist Single Bloom Coaster Set
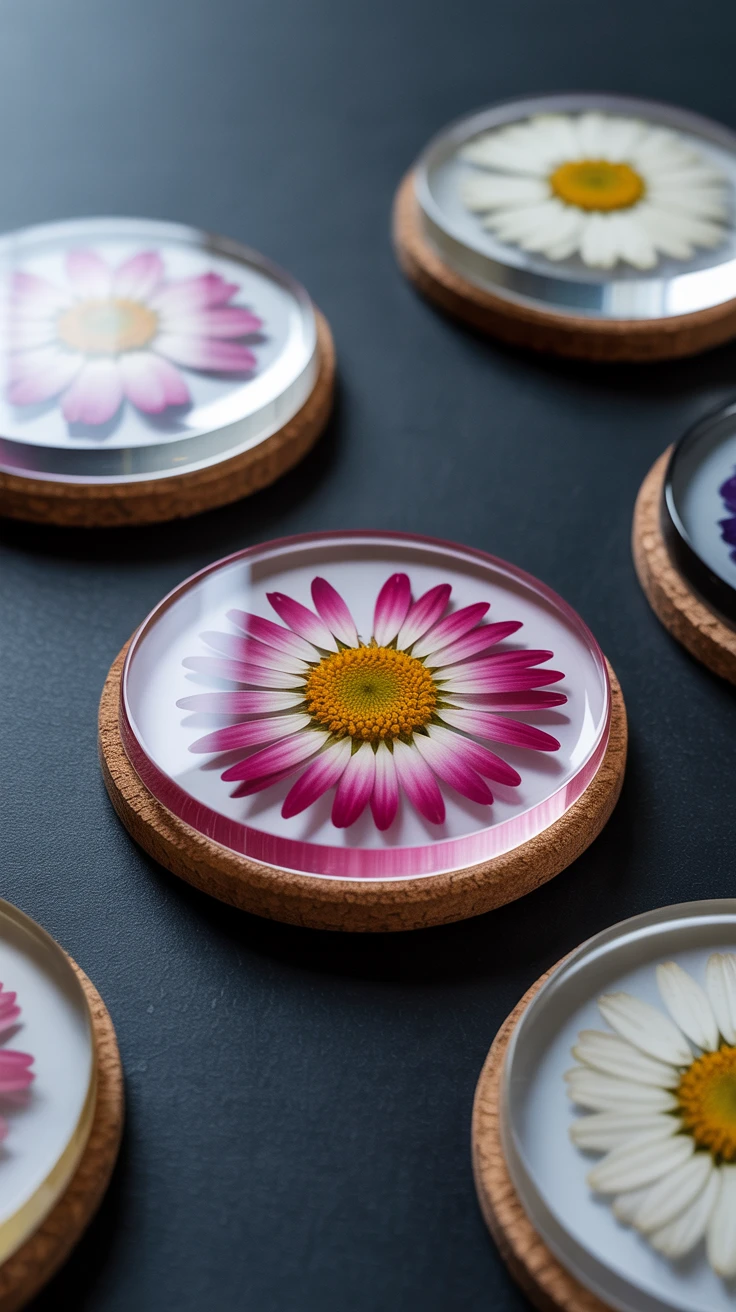
Sometimes less is more, and these elegant single-bloom coasters prove it. They’re perfect for the minimalist who still appreciates a touch of nature in their decor.
What You’ll Need:
- Small round coaster silicone molds (4″ diameter)
- Clear epoxy resin
- Individual pressed flowers (roses, pansies, or daisies work beautifully)
- White or black background tint (optional)
- Cork backing
- Strong adhesive
For each coaster, select a single perfect bloom as the focal point. Position it slightly off-center for a more dynamic look. You can create a set with the same flower type in different colors, or mix flower varieties for an eclectic collection.

View on AmazonAs an Amazon Associate, I earn from qualifying purchases.

View on AmazonAs an Amazon Associate, I earn from qualifying purchases.
Pro Tip: Add a drop of white pigment to your first layer of resin to create a soft, milky background that makes the flower colors stand out dramatically.
4. Seasonal Flower Collection Display
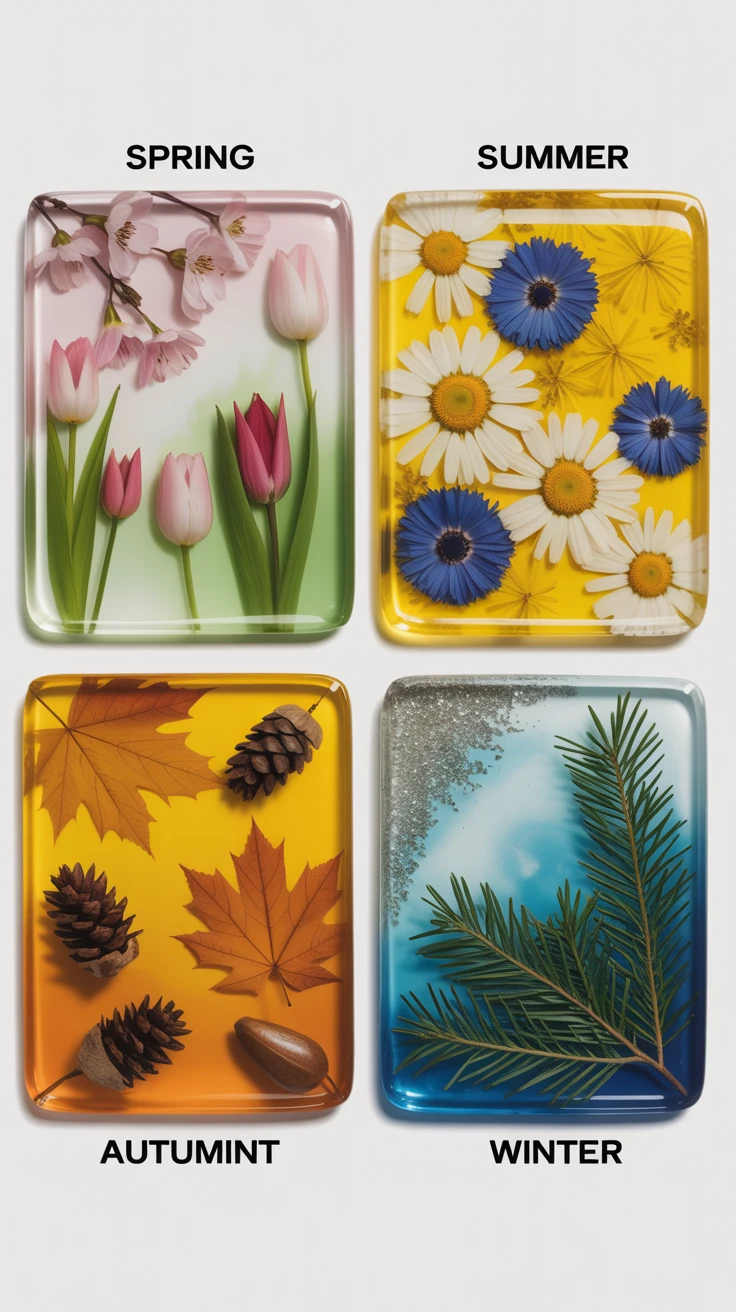
Why limit yourself to one season’s blooms? Create a series of four coordinating trays, each showcasing flowers from a different season for a changing display throughout the year.
What You’ll Need:
- Four identical square silicone molds
- Clear epoxy resin
- Seasonal pressed flowers (spring tulips, summer sunflowers, autumn leaves, winter holly)
- Subtle tints that evoke each season
- Small decorative elements (tiny pinecones, seed pods, etc.)
I love how this project connects you to the cyclical nature of the year. For spring, think cherry blossoms and tulip petals with a pale green tint. Summer calls for vibrant daisies and cornflowers against clear resin. Fall is perfect for amber-tinted resin with maple leaves and seed pods, while winter can feature holly, evergreen sprigs, and perhaps a touch of silver mica.
Pro Tip: Label the underside of each tray with the season and year you collected the flowers for a meaningful timeline of nature’s beauty.
5. Pressed Flower Jewelry Organizer
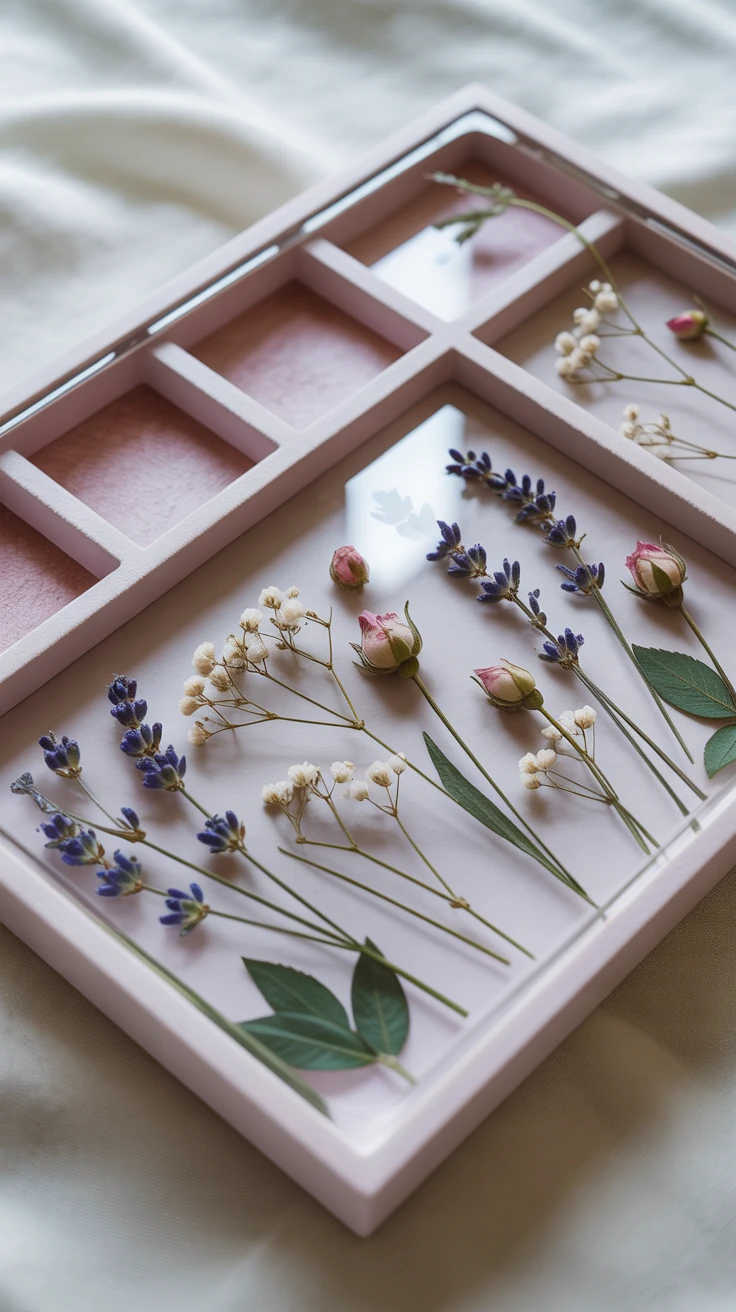
Keep your favorite accessories organized on a tray that’s just as beautiful as your jewelry collection. This functional piece doubles as vanity decor!
What You’ll Need:
- Rectangular silicone mold with raised edges
- Clear epoxy resin
- Small delicate pressed flowers (lavender, baby’s breath, small rose buds)
- Velvet fabric for lining (optional)
- Small dividers or compartments (can be created with additional resin pours)
The key to a successful jewelry organizer is creating defined spaces for different types of accessories. You can either use a mold with built-in compartments or create your own by doing a base pour, adding small silicone dividers, then pouring around them.

View on AmazonAs an Amazon Associate, I earn from qualifying purchases.

View on AmazonAs an Amazon Associate, I earn from qualifying purchases.
Pro Tip: Add a thin layer of velvet to the bottom of each compartment before the final resin pour for a luxurious touch that also prevents jewelry from sliding around.
6. Custom Wedding Keepsake Tray
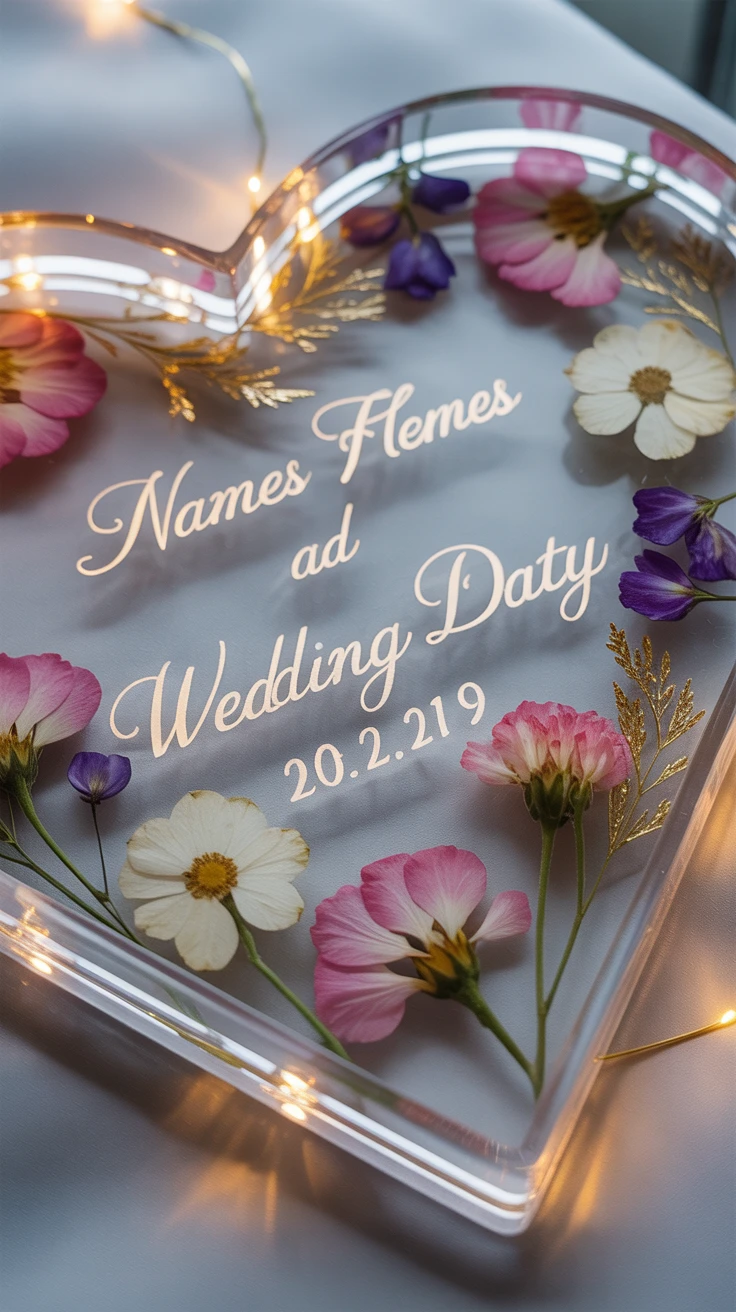
Have you kept the flowers from your wedding bouquet? Or perhaps you’re looking for a meaningful wedding gift? This personalized keepsake preserves those special blooms forever.
What You’ll Need:
- Heart or rectangular silicone mold
- Clear epoxy resin
- Pressed flowers from a wedding bouquet
- Small letter stamps or printed text for names/date
- White or pearl mica powder
- Fine gold leaf (optional)
This project requires special care since you’re working with irreplaceable flowers. I recommend practicing your arrangement several times before committing to the resin pour. Consider incorporating other wedding elements like a tiny piece of lace from the dress or a small printed photo.
Pro Tip: Create a frosted effect in certain areas by lightly sanding between layers, then add the names and wedding date in a beautiful script for a truly personalized keepsake.
7. Layered Floral Resin Breakfast Tray
Imagine starting your day with breakfast in bed served on a tray that looks like flowers floating in a clear pond. This larger project creates a showstopper piece for special occasions.
What You’ll Need:
- Large rectangular tray mold with handles
- Clear epoxy resin (food-safe formula)
- Various pressed flowers in coordinating colors
- Wooden handles or knobs
- Drill and appropriate hardware
- Non-skid feet
The magic of this tray comes from creating multiple layers with flowers at different depths. Pour a thin base layer, let it partially set until tacky, then place your first flowers. Continue building layers, allowing each to become tacky before adding more flowers and resin. This creates a stunning 3D effect that looks like the blooms are suspended at different levels.
Pro Tip: Add a few drops of blue alcohol ink to the deepest layer for a water-like effect that enhances the floating flower illusion.
8. Resin Flower Catchall Dishes
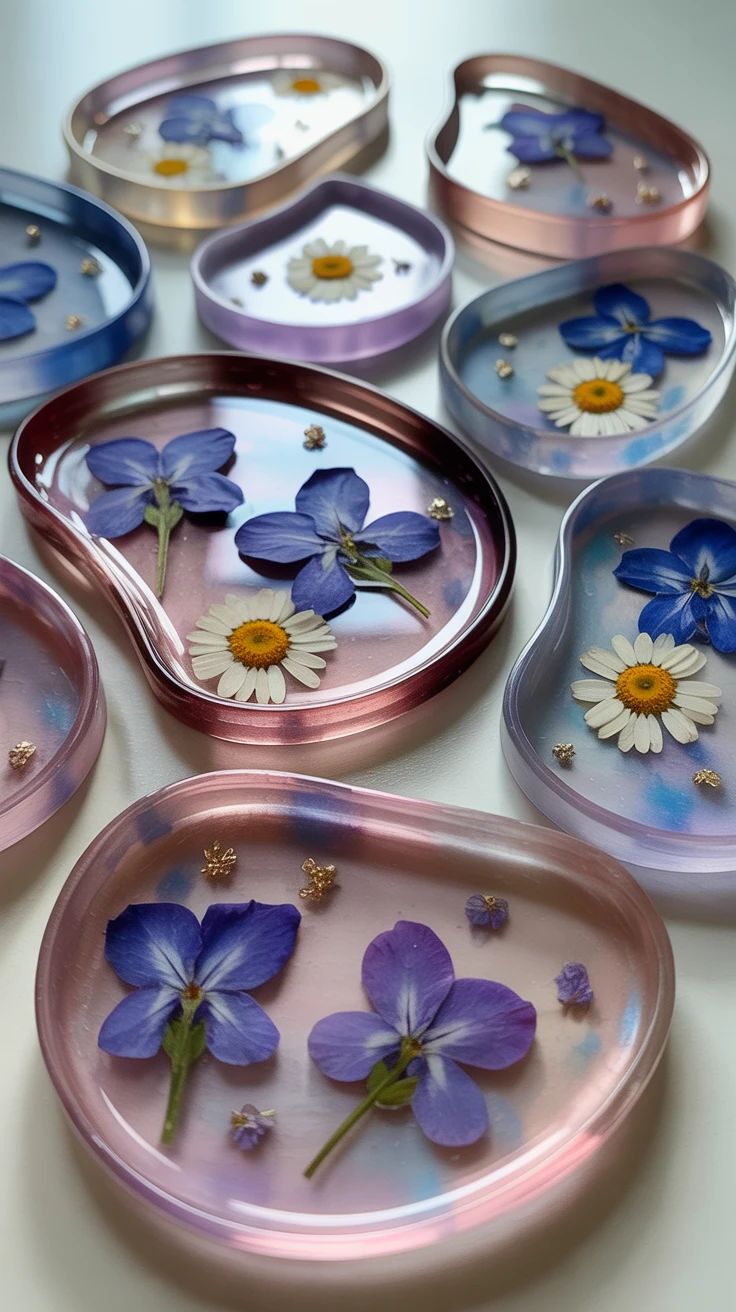
These small, practical dishes are perfect for holding rings by the sink, paper clips on your desk, or small candies on your coffee table. They’re also quick to make, so you can create several in an afternoon.
What You’ll Need:
- Small round or irregular-shaped silicone molds
- Clear epoxy resin
- Tiny pressed flowers (violets, forget-me-nots, small daisy petals)
- Metallic powder or alcohol ink for accents
- Felt padding for the bottom
The small size of these dishes makes them perfect for experimenting with different techniques. Try creating a geode-like effect on the edges with mica powder, or add a marbled swirl of color that complements your flower choices.
Pro Tip: Make a matching set in graduated sizes that nest inside each other for storage, each featuring the same flower type in different arrangements.
9. Dried Herb and Flower Kitchen Tray
Combine the beauty of flowers with the practicality of a kitchen serving tray. This herb-inspired design is perfect for the culinary enthusiast who appreciates beautiful presentation.
What You’ll Need:
- Medium rectangular silicone mold
- Food-safe clear epoxy resin
- Pressed culinary herbs (rosemary, thyme, sage leaves)
- Edible flowers (pressed pansies, violets, or nasturtiums)
- Wooden or stainless steel handles
- Heat-resistant finish
Arrange your herbs and edible flowers in a pattern reminiscent of a garden plot or herb border. Consider grouping similar herbs together with flower accents for a design that tells a culinary story. This tray is perfect for serving tea, displaying cheeses, or presenting homemade bread.
Pro Tip: Add handwritten or printed labels next to each herb variety before your final resin pour for an educational touch that doubles as decor.
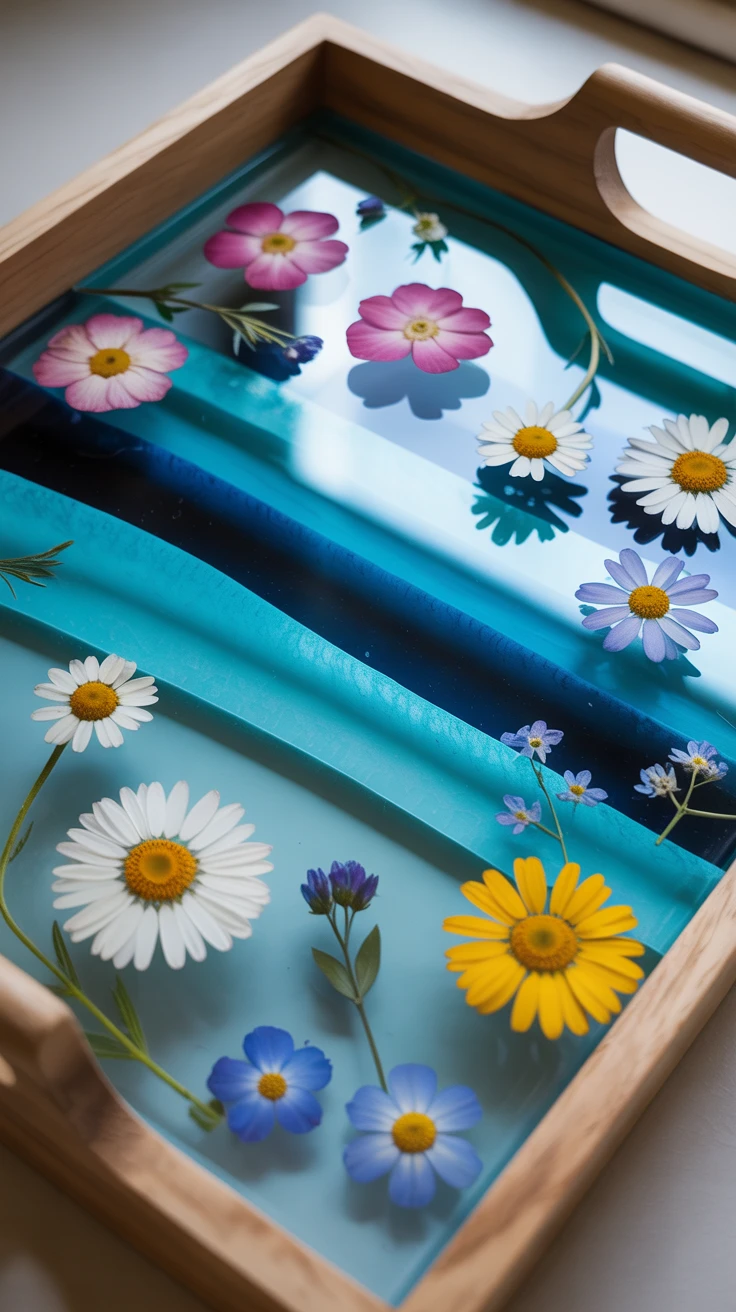
10. Floating Flower Decorative Platter
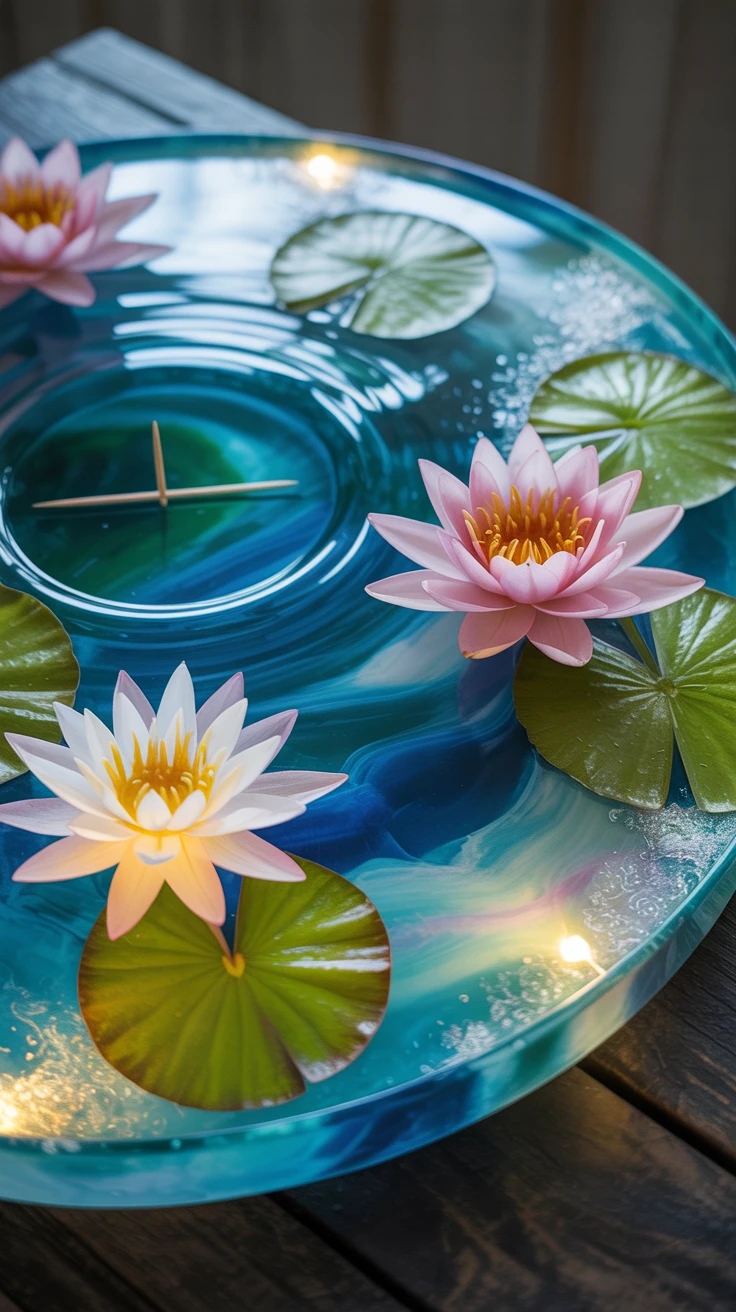
For a real conversation starter, this large decorative platter creates the illusion of flowers floating in a crystal-clear pond. It’s perfect as a centerpiece or wall hanging.
What You’ll Need:
- Large circular silicone mold (10-12″ diameter)
- Clear epoxy resin
- Pressed water lilies, lotus flowers, or other aquatic blooms
- Blue and green alcohol inks
- White mica powder
- Display stand
The key to this stunning project is creating a convincing water effect. Start with a base layer tinted slightly blue. Once partially set, add your flowers, then build up layers with subtle variations in blue tint. Create gentle “ripples” with a toothpick drawn through partially set resin, and add tiny touches of white mica to mimic light reflecting off water.
Pro Tip: Position a small LED light behind or under your finished platter when displaying to illuminate the layers and create an even more realistic water effect.
Key Takeaways for DIY Resin Trays with Flowers
- Always work in a well-ventilated area and use proper safety equipment when handling resin.
- Thoroughly dry and press flowers before using them in resin projects to prevent browning.
- Work in thin layers for the best results, especially when positioning flowers at different depths.
- Use a heat gun or torch briefly to remove bubbles from each layer before it sets.
- Allow adequate curing time according to your resin manufacturer’s instructions—rushing this step can ruin your project.
Conclusion: Your Floral Resin Journey Awaits
There’s something incredibly satisfying about creating DIY resin trays with flowers that capture nature’s fleeting beauty in a permanent, functional form. Whether you’re preserving memories from a special occasion or simply bringing the garden indoors, these projects offer endless creative possibilities. I hope these 10 ideas have inspired you to try your hand at this rewarding craft!


Remember that like any skill, resin crafting gets better with practice. Don’t be discouraged if your first attempt isn’t perfect—each project teaches you something new. Before long, you’ll be creating stunning DIY resin trays with pressed flowers that friends and family will swear came from a high-end boutique. Happy crafting, and may your home be filled with floral beauty that lasts forever!
Frequently Asked Questions
How do I prevent bubbles in my resin tray projects?
Bubbles are the nemesis of clear resin projects! To minimize them, warm your resin bottles in warm water before mixing (never microwave), stir slowly to avoid introducing air, and use a heat gun or torch held 6-8 inches away to pop surface bubbles. Working in a warm room (around 75°F) also helps the bubbles rise more easily to the surface.
What types of flowers work best for resin casting?
Flowers with naturally flat profiles like pansies, daisies, and larkspur work beautifully. Avoid very thick flowers like roses unless you press them thoroughly. Flowers with lower moisture content (like statice, baby’s breath, and lavender) typically preserve their color better in resin than juicier blooms.
How long does resin take to cure completely?
Most epoxy resins require 24-48 hours to cure to the touch, but complete hardening can take up to a week. Follow your specific product’s instructions, as formulations vary. Remember that thicker pours take longer to cure than thin layers, and temperature affects curing time significantly.
Can I use fresh flowers in resin?
I don’t recommend using fresh flowers as they contain moisture that will cause them to discolor, cloud the resin, or even develop mold over time. Always thoroughly dry flowers for at least 2-3 weeks by pressing them between absorbent paper in a flower press or heavy book before using in resin projects.
Is epoxy resin safe to use for food-serving trays?
Not all resins are food-safe! If you’re creating trays for food service, you must use a resin specifically labeled as “food-safe” or “FDA compliant” when cured. Even with food-safe resin, I recommend using the trays for serving wrapped or dry foods rather than placing food directly on the resin surface.
How do I properly press flowers for resin projects?
For best results, place freshly picked flowers between two sheets of absorbent paper (like coffee filters or blotting paper), then place in a flower press or between the pages of a heavy book. Add additional weight on top and change the paper every few days to absorb moisture. Most flowers need 2-3 weeks to dry completely.
What tools do I need for DIY resin tray projects?
The essentials include: silicone molds in your desired shapes, measuring cups, stir sticks, nitrile gloves, protective eyewear, a respirator mask or good ventilation, a heat gun or torch for bubble removal, and of course, quality epoxy resin. Optional but helpful tools include tweezers for positioning flowers, a level surface, and silicone mats to protect your work area.
